Some links in this post are affiliate links, so I may earn a small commission if you make a purchase. It’s a great way to support Crafty Bones, and it doesn’t cost you anything extra! You can find more details in our Privacy Policy.
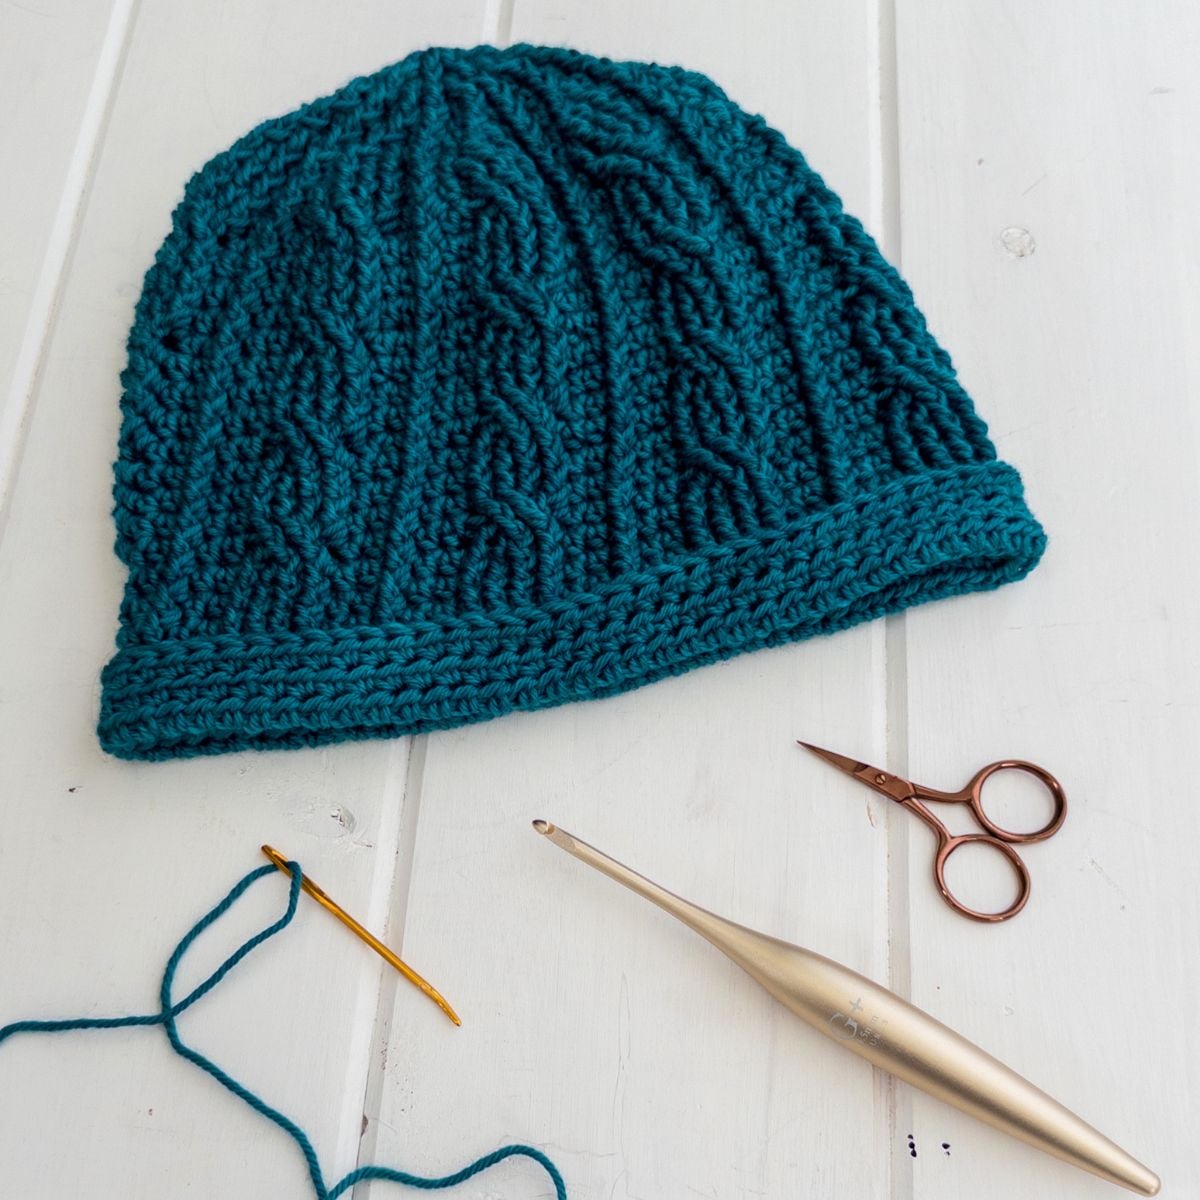
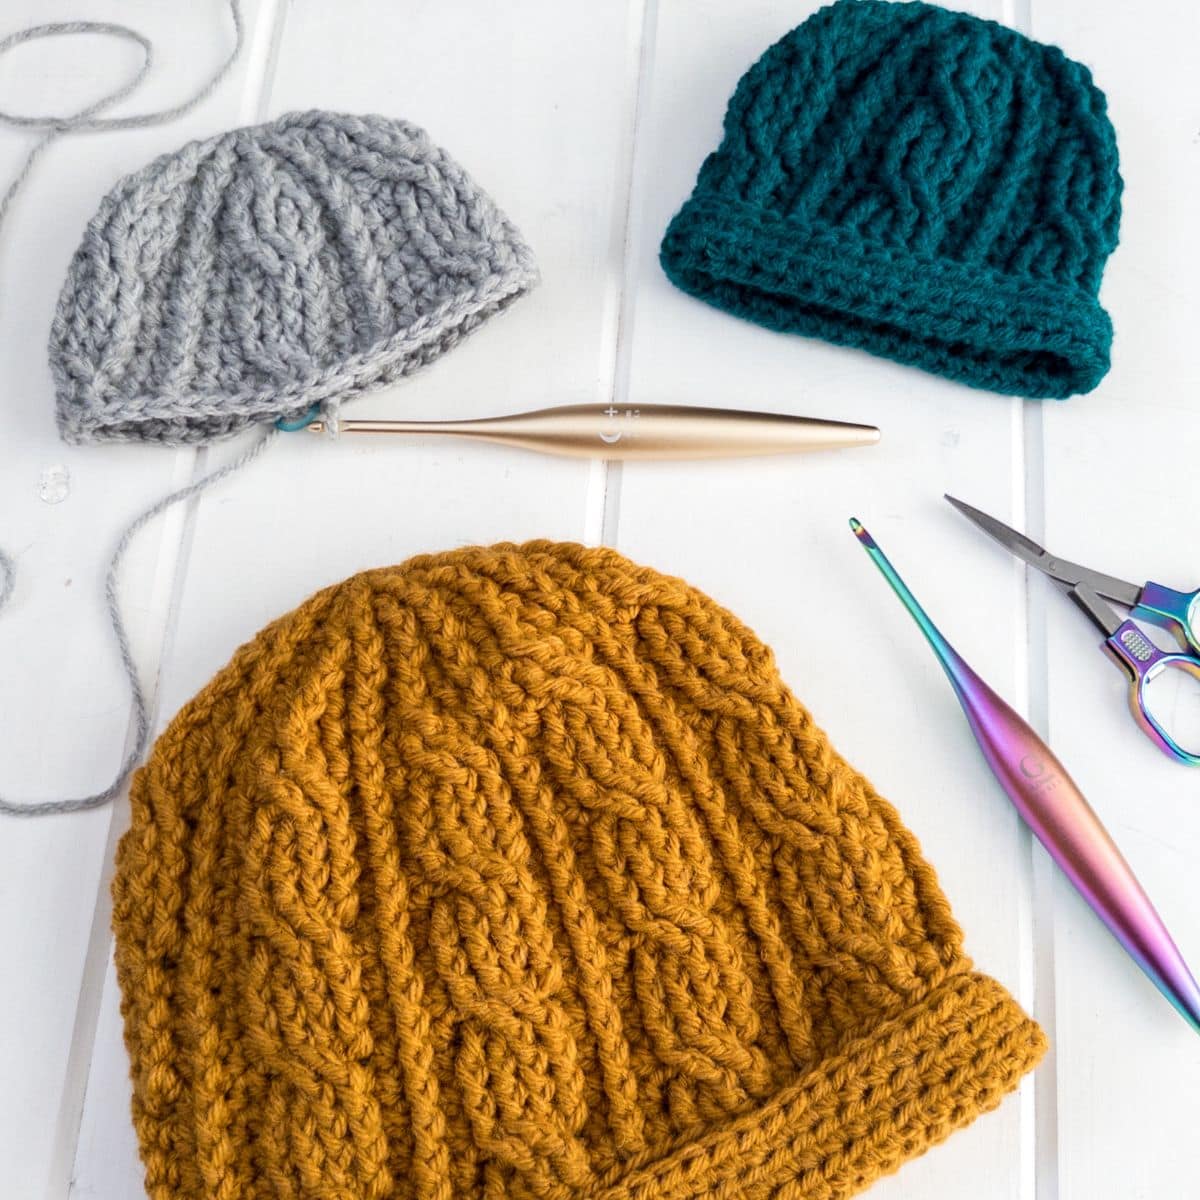
If you love creating pieces that feel timeless, textured, and made to last, The Sintra Cabled Crochet Hat is an heirloom crochet pattern designed to do exactly that. This cabled crochet hat pattern was inspired by my time in Sintra, Portugal and features rich texture, a structured double brim, and 11 sizes from newborn to adult.

While on a recent crochet retreat in Portugal, this design was born from a visit to the breathtaking town of Sintra, where intricate architecture, layered textures, and centuries-old craftsmanship come together in the most unforgettable way.
Between exploring the ornate details of the palace and participating in a hands-on cable workshop taught by Lee of Coco Crochet Lee during the retreat, I found myself completely drawn to the structure and movement of cables. It was something I knew I wanted to translate into crochet.
This hat is the result. A piece that blends travel, texture, and technique into something truly special.
The Inspiration Behind The Sintra
Sintra is known for its romantic architecture, intricate stonework, and layered design details. It was impossible not to notice the parallels between those flowing structures and the movement of crochet cables.
Walking through the palace, I kept noticing:
- The repeating patterns carved into the walls
- The depth created through layered textures
- The way structure and softness exist together in every detail
- That same feeling is what I wanted to capture in this design.
- Combined with the cable workshop we had during the retreat, this hat became more than just a project. It became a way to translate that experience into an heirloom crochet pattern you can make and wear.
Why I Love This Heirloom Crochet Pattern
There is something special about a project that feels both elevated and wearable.
What makes The Sintra stand out:
- The cable detailing creates movement and depth
- The ribbed brim adds structure and a clean finish
- It has a timeless, heirloom-quality look
- The repeat becomes intuitive and enjoyable
- This is the kind of crochet piece that becomes part of your winter staples for years to come.
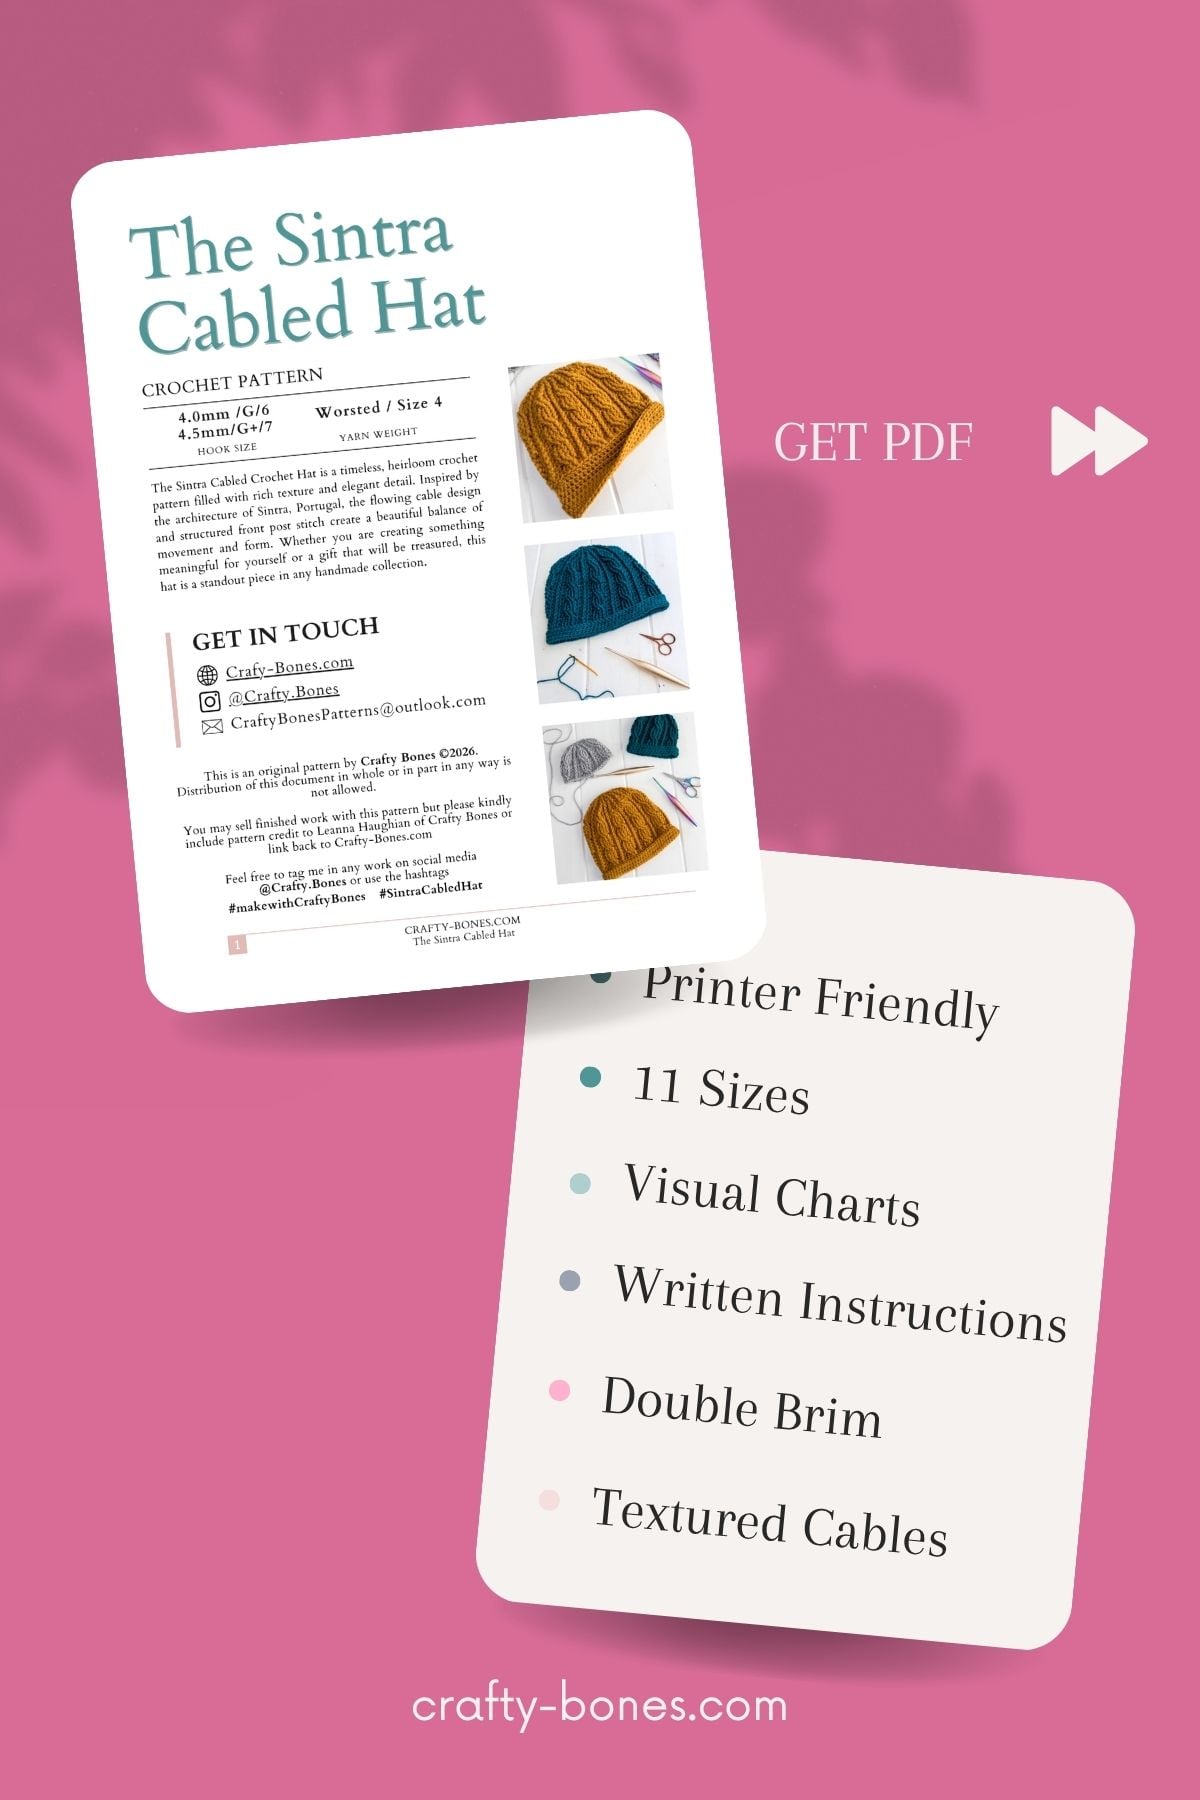
International Crochet Month Blog Hop + Free Download
To celebrate International Crochet Month, this pattern is part of a special blog hop featuring designs from makers around the world.
For one day only, you will be able to download the PDF version of The Sintra Cabled Crochet Hat for free.
- The free download on Ravelry will be available March 26 2026 only
- Use code 2026CrochetMonth
- This is a great opportunity to grab an heirloom crochet pattern you can return to again and again.

Working the Cable Texture
If you have never worked crochet cables before, this pattern is a great introduction.
The texture is created by working around stitches from previous rows, forming that signature twisted look. Once you recognize the repeat, the pattern becomes rhythmic and easy to follow.
Before You Get Started
This project is all about slowing down and enjoying the process.
Take your time with the first cable repeat. Once it clicks, you will find a rhythm that makes this pattern both calming and satisfying to create.
Just like the inspiration behind it, this is a piece meant to be appreciated in the details.
Skill Level and Materials
This crochet cabled hat pattern is suitable for intermediate and advanced beginner crocheters looking to expand their skills.

Share Your Crochet Hat Creations
I’d love to see how you make this pattern your own! Share your finished crochet cabled hat on Instagram using #SintraCabledHat or #MakewithCraftyBones and tag @CraftyBones. Let’s inspire others to create and celebrate the beauty of handmade.
Grab your favourite worsted weight yarn and 4.0 & 4.5 mm crochet hook and start your next crochet adventure with The Sintra Cabled Hat. This elegant design is more than just a project—it’s a masterpiece in the making!
Materials Needed
Crochet Stitches & Abbreviations
US Terms
Back Loop Only |
blo |
|
Chain |
ch |
|
Double Crochet |
dc |
|
Front Post Double Crochet |
fpdc |
|
Front Post Treble Crochet |
fptr |
|
Half Double Crochet |
hdc |
|
Skip / Skipped |
sk/skp |
|
Slip Stitch |
sl st |
|
Space |
sp |
|
Stitch/Stitches |
st/sts |
Special Stitches for this Pattern
Other Patterns you might enjoy
Heirloom Shell & Lace Throw Blanket

Looking to learn new techniques or perfect your skills, our FREE library has everything you need to elevate your crochet projects.
Size Chart


Get the ad-free PDF of the
The Sintra Cabled Crochet Hat
Discover the joy of crochet with Crafty Bones.
Tips for making this pattern
- While working this pattern I would recommend using a stitch marker to mark the first stitch of the row.
- Beginning ch does NOT count as a st
- Pick a yarn that highlights texture. The pattern uses Size 4 / Worsted Weight Yarn. Select a solid colour for best results visually.
- Finish off the Hat by adding a pom pom and a personalized tag if you wish.
Not interested in the PDF? The free version of the pattern is just below for you to enjoy.
Instructions for Size 1
Remember, the turning chain does NOT count as your first stitch.
4.5mm (G+/7) Hook
R 1: Start with a magic circle. Ch 2, dc 10 into the magic circle. Slst to first st to join. <10 sts>
R 2: Ch 1, work a (hdc, and fpdc) into each of the sts, slst to first st to join. <20sts>
R 3: Ch 1, * hdc, (dc, fpdc, dc) into fpdc from previous row, hdc, fpdc, repeat from * till end, slst to first st to join. <30sts>
R 4: Ch 1, * hdc, fpdc, fpdc, (dc, fpdc), hdc, fpdc, repeat from * till end, slst to first st to join. <35sts>
R 5: Ch 1, * hdc, sk 2 sts, fptr, fptr, work back into skp sts overtop of last two sts, fptr, fptr, hdc in the next st, fpdc, repeat from * till end, slst to first st to join. <35sts>
R 6 – 8: Ch 1, * hdc, fpdc, fpdc, fpdc, fpdc, hdc, fpdc, repeat from * till end, slst to first st to join. <35sts>
R 9: Ch 1, * hdc, sk 2 sts, fptr, fptr, work back into skp sts overtop of last two sts, fptr, fptr, hdc in the next st, fpdc, repeat from * till end, slst to first st to join. <35sts>
R 10 – 12: Ch 1, * hdc, fpdc, fpdc, fpdc, fpdc, hdc, fpdc, repeat from * till end, slst to first st to join. <35sts>
Brim
4.0mm (G/6) Hook
R 1: Ch 1, hdcblo into each of the sts around, slst to first st to join. <35sts>
R 2 – 5: Ch 1, hdc around, slst to first st to join. <35sts>
Tie off, leave a tail approximately 2x the circumference of the hat.
Following the Brim Seaming Instructions to seam up the brim of the hat.
Instructions for Size 2
Remember, the turning chain does NOT count as your first stitch.
4.5mm (G+/7) Hook
R 1: Start with a magic circle. Ch 2, dc 10 into the magic circle. Slst to first st to join. <10 sts>
R 2: Ch 1, work a (hdc and fpdc) into each of the sts, slst to first st to join. <20sts>
R 3: Ch 1, * hdc, (dc, fpdc, dc) into fpdc from previous row, hdc, fpdc, repeat from * till end, slst to first st to join. <30sts>
R 4: Ch 1, * hdc, fpdc, fpdc, (dc, fpdc), hdc, fpdc, repeat from * till end, slst to first st to join. <35sts>
R 5: Ch 1, * (hdc, hdc), sk 2 sts, fptr, fptr, work back into skp sts overtop of last two sts, fptr, fptr, (hdc, hdc) in the next st, fpdc, repeat from * till end, slst to first st to join. <45sts>
R 6 – 8: Ch 1, * hdc, hdc, fpdc, fpdc, fpdc, fpdc, hdc, hdc, fpdc, repeat from * till end, slst to first st to join. <45sts>
R 9: Ch 1, * hdc, hdc, sk 2 sts, fptr, fptr, work back into skp sts overtop of last two sts, fptr, fptr, hdc in the next st, hdc, fpdc, repeat from * till end, slst to first st to join. <45sts>
R 10 – 12: Ch 1, * hdc, hdc, fpdc, fpdc, fpdc, fpdc, hdc, hdc, fpdc, repeat from * till end, slst to first st to join. <45sts>
Brim
4.0mm (G/6) Hook
R 1: Ch 1, hdcblo into each of the sts around, slst to first st to join. <45sts>
R 2 – 5: Ch 1, hdc around, slst to first st to join. <45sts>
Tie off, leave a tail approximately 2x the circumference of the hat.
Following the Brim Seaming Instructions to seam up the brim of the hat.
Instructions for Size 3
Remember, the turning chain does NOT count as your first stitch.
4.5mm (G+/7) Hook
R 1: Start with a magic circle. Ch 2, dc 10 into the magic circle. Slst to first st to join. <10 sts>
R 2: Ch 1, work a hdc and fpdc into each of the sts, slst to first st to join. <20sts>
R 3: Ch 1, * hdc, (dc, fpdc, dc) into fpdc from previous row, hdc, fpdc, repeat from * till end, slst to first st to join. <30sts>
R 4: Ch 1, * (hdc, hdc), fpdc, fpdc, (dc, fpdc), hdc, fpdc, repeat from * till end, slst to first st to join. <40sts>
R 5: Ch 1, * hdc, (hdc, hdc), sk 2 sts, fptr, fptr, work back into skp sts overtop of last two sts, fptr, fptr, (hdc, hdc) in the next st, fpdc, repeat from * till end, slst to first st to join. <50sts>
R 6 – 8: Ch 1, * hdc, hdc, hdc, fpdc, fpdc, fpdc, fpdc, hdc, hdc, fpdc, repeat from * till end, slst to first st to join. <50sts>
R 9: Ch 1, * hdc, hdc, hdc, sk 2 sts, fptr, fptr, work back into skp sts overtop of last two sts, fptr, fptr, hdc, hdc, fpdc, repeat from * till end, slst to first st to join. <50sts>
R 10 – 15: Repeat R 6-9
Brim
4.0mm (G/6) Hook
R 1: Ch 1, hdcblo into each of the sts around, slst to first st to join. <45sts>
R 2 – 6: Ch 1, hdc around, slst to first st to join. <50sts>
Tie off, leave a tail approximately 2x the circumference of the hat.
Following the Brim Seaming Instructions to seam up the brim of the hat.
Instructions for Size 4
Remember, the turning chain does NOT count as your first stitch.
4.5mm (G+/7) Hook
R 1: Start with a magic circle. Ch 2, dc 10 into the magic circle. Slst to first st to join. <10 sts>
R 2: Ch 1, work a (hdc and fpdc) into each of the sts, slst to first st to join. <20sts>
R 3: Ch 1, * hdc, (dc, fpdc, dc) into fpdc from previous row, hdc, fpdc, repeat from * till end, slst to first st to join. <30sts>
R 4: Ch 1, * hdc, fpdc, fpdc, (dc, fpdc), hdc, fpdc, repeat from * till end, slst to first st to join. <35sts>
R 5: Ch 1, * (hdc, hdc), sk 2 sts, fptr, fptr, work back into skp sts overtop of last two sts, fptr, fptr, (hdc, hdc) in the next st, fpdc, repeat from * till end, slst to first st to join. <45sts>
R 6: Ch 1, * hdc, (hdc, hdc), fpdc, fpdc, fpdc, fpdc, (hdc, hdc), hdc, fpdc, repeat from * till end, slst to first st to join. <55sts>
R 7 – 8: Ch 1, * hdc, hdc, hdc, fpdc, fpdc, fpdc, fpdc, hdc, hdc, hdc, fpdc, repeat from * till end, slst to first st to join. <55sts>
R 9: Ch 1, * hdc, hdc, hdc, sk 2 sts, fptr, fptr, work back into skp sts overtop of last two sts, fptr, fptr, hdc in the next st, hdc, hdc, fpdc, repeat from * till end, slst to first st to join. <55sts>
R 10 – 12: Ch 1, * hdc, hdc, fpdc, fpdc, fpdc, fpdc, hdc, hdc, fpdc, repeat from * till end, slst to first st to join. <55sts>
R 13 – 18: Repeat R 9-12.
Brim
4.0mm (G/6) Hook
R 1: Ch 1, hdcblo into each of the sts around, slst to first st to join. <55sts>
R 2 – 6: Ch 1, hdc around, slst to first st to join. <55sts>
Tie off, leave a tail approximately 2x the circumference of the hat.
Following the Brim Seaming Instructions to seam up the brim of the hat.
Instructions for Size 5
Remember, the turning chain does NOT count as your first stitch.
4.5mm (G+/7) Hook
R 1: Start with a magic circle. Ch 2, dc 8 into the magic circle. Slst to first st to join. <8 sts>
R 2: Ch 2, work a (dc, fpdc) into each of the sts, slst to first st to join. <16sts>
R 3: Ch 1, * (hdc, fpdc) into dc from previous row, fpdc, repeat from * till end, slst to first st to join. <24sts>
R 4: Ch 1, * hdc, (fpdc, hdc), fpdc, repeat from * till end, slst to first st to join. <32sts>
R 5: Ch 1, * hdc, (fpdc, dc), hdc, fpdc, repeat from * till end, slst to first st to join. <40sts>
R 6: Ch 1, * hdc, (fpdc, dc), fpdc, hdc, fpdc, repeat from * till end, slst to first st to join. <48sts>
R 7: Ch 1, * hdc, (dc, fpdc), fpdc, fpdc, hdc, fpdc, repeat from * till end, slst to first st to join. <56sts>
R 8: Ch 1, * hdc, sk 2 sts, fptr, fptr, work back into skp sts, fptr, fptr, hdc, fpdc, repeat from * till end, slst to first st to join. <56sts>
R 9 – 11: Ch 1, * hdc, fpdc, fpdc, fpdc, fpdc, hdc, fpdc, repeat from * till end, slst to first st to join. <56sts>
R 12 – 18: Repeat R 8-11
Brim
4.0mm (G/6) Hook
R 1: Ch 1, hdcblo into each of the sts around, slst to first st to join. <56sts>
R 2 – 7: Ch 1, hdc around, slst to first st to join. <56sts>
Tie off, leave a tail approximately 2x the circumference of the hat.
Following the Brim Seaming Instructions to seam up the brim of the hat.
Instructions for Size 6
Remember, the turning chain does NOT count as your first stitch.
4.5mm (G+/7) Hook
R 1: Start with a magic circle. Ch 2, dc 9 into the magic circle. Slst to first st to join. <9 sts>
R 2: Ch 2, work a (dc, fpdc) into each of the sts, slst to first st to join. <18sts>
R 3: Ch 1, * (hdc, fpdc) into dc from previous row, fpdc, repeat from * till end, slst to first st to join. <27sts>
R 4: Ch 1, * hdc, (fpdc, hdc), fpdc, repeat from * till end, slst to first st to join. <36sts>
R 5: Ch 1, * hdc, (fpdc, dc), hdc, fpdc, repeat from * till end, slst to first st to join. <45sts>
R 6: Ch 1, * hdc, (fpdc, dc), fpdc, hdc, fpdc, repeat from * till end, slst to first st to join. <54sts>
R 7: Ch 1, * hdc, (dc, fpdc), fpdc, fpdc, hdc, fpdc, repeat from * till end, slst to first st to join. <63sts>
R 8: Ch 1, * hdc, sk 2 sts, fptr, fptr, work back into skp sts, fptr, fptr, hdc, fpdc, repeat from * till end, slst to first st to join. <63sts>
R 9 – 11: Ch 1, * hdc, fpdc, fpdc, fpdc, fpdc, hdc, fpdc, repeat from * till end, slst to first st to join. <63sts>
R 12 – 19: Repeat R 8-11
Brim
4.0mm (G/6) Hook
R 1: Ch 1, hdcblo into each of the sts around, slst to first st to join. <63sts>
R 2 – 7: Ch 1, hdc around, slst to first st to join. <63sts>
Tie off, leave a tail approximately 2x the circumference of the hat.
Following the Brim Seaming Instructions to seam up the brim of the hat.
Instructions for Size 7
Remember, the turning chain does NOT count as your first stitch.
4.5mm (G+/7) Hook
R 1: Start with a magic circle. Ch 2, dc 10 into the magic circle. Slst to first st to join. <10 sts>
R 2: Ch 2, work a (dc, fpdc) into each of the sts, slst to first st to join. <20sts>
R 3: Ch 1, * (hdc, fpdc) into dc from previous row, fpdc, repeat from * till end, slst to first st to join. <30sts>
R 4: Ch 1, * hdc, (fpdc, hdc), fpdc, repeat from * till end, slst to first st to join. <40sts>
R 5: Ch 1, * hdc, (fpdc, dc), hdc, fpdc, repeat from * till end, slst to first st to join. <50sts>
R 6: Ch 1, * hdc, (fpdc, dc), fpdc, hdc, fpdc, repeat from * till end, slst to first st to join. <60sts>
R 7: Ch 1, * hdc, (dc, fpdc), fpdc, fpdc, hdc, fpdc, repeat from * till end, slst to first st to join. <70sts>
R 8: Ch 1, * hdc, sk 2 sts, fptr, fptr, work back into skp sts, fptr, fptr, hdc, fpdc, repeat from * till end, slst to first st to join. <70sts>
R 9 – 11: Ch 1, * hdc, fpdc, fpdc, fpdc, fpdc, hdc, fpdc, repeat from * till end, slst to first st to join. <70sts>
R 12 – 20: Repeat R 8-11
Brim
4.0mm (G/6) Hook
R 1: Ch 1, hdcblo into each of the sts around, slst to first st to join. <70sts>
R 2 – 7: Ch 1, hdc around, slst to first st to join. <70sts>
Tie off, leave a tail approximately 2x the circumference of the hat.
Following the Brim Seaming Instructions to seam up the brim of the hat.
Instructions for Size 8
Remember, the turning chain does NOT count as your first stitch.
4.5mm (G+/7) Hook
R 1: Start with a magic circle. Ch 2, dc 11 into the magic circle. Slst to first st to join. <11 sts>
R 2: Ch 2, work a (dc, fpdc) into each of the sts, slst to first st to join. <22sts>
R 3: Ch 1, * (hdc, fpdc) into dc from previous row, fpdc, repeat from * till end, slst to first st to join. <33sts>
R 4: Ch 1, * hdc, (fpdc, hdc), fpdc, repeat from * till end, slst to first st to join. <44sts>
R 5: Ch 1, * hdc, (fpdc, dc), hdc, fpdc, repeat from * till end, slst to first st to join. <55sts>
R 6: Ch 1, * hdc, (fpdc, dc), fpdc, hdc, fpdc, repeat from * till end, slst to first st to join. <66sts>
R 7: Ch 1, * hdc, (dc, fpdc), fpdc, fpdc, hdc, fpdc, repeat from * till end, slst to first st to join. <77sts>
R 8: Ch 1, * hdc, sk 2 sts, fptr, fptr, work back into skp sts, fptr, fptr, hdc, fpdc, repeat from * till end, slst to first st to join. <77sts>
R 9 – 11: Ch 1, * hdc, fpdc, fpdc, fpdc, fpdc, hdc, fpdc, repeat from * till end, slst to first st to join. <77sts>
R 12 – 21: Repeat R 8-11
Brim
4.0mm (G/6) Hook
R 1: Ch 1, hdcblo into each of the sts around, slst to first st to join. <77sts>
R 2 – 8: Ch 1, hdc around, slst to first st to join. <77sts>
Tie off, leave a tail approximately 2x the circumference of the hat.
Following the Brim Seaming Instructions to seam up the brim of the hat.
Instructions for Size 9
Remember, the turning chain does NOT count as your first stitch.
4.5mm (G+/7) Hook
R 1: Start with a magic circle. Ch 2, dc 8 into the magic circle. Slst to first st to join. <8 sts>
R 2: Ch 2, work a (dc, fpdc) into each of the sts, slst to first st to join. <16sts>
R 3: Ch 1, * (hdc, fpdc) into dc from previous row, fpdc, repeat from * till end, slst to first st to join. <24sts>
R 4: Ch 1, * hdc, (fpdc, hdc), fpdc, repeat from * till end, slst to first st to join. <32sts>
R 5: Ch 1, * hdc, (fpdc, dc), hdc, fpdc, repeat from * till end, slst to first st to join. <40sts>
R 6: Ch 1, * hdc, (fpdc, dc), fpdc, hdc, fpdc, repeat from * till end, slst to first st to join. <48sts>
R 7: Ch 1, * hdc, (dc, fpdc), fpdc, fpdc, hdc, fpdc, repeat from * till end, slst to first st to join. <56sts>
R 8: Ch 1, * (hdc, hdc), sk 2 sts, fptr, fptr, work back into skp sts, fptr, fptr, hdc, fpdc, repeat from * till end, slst to first st to join. <64sts>
R 9: Ch 1, * hdc, hdc, fpdc, fpdc, fpdc, fpdc, (hdc, hdc), fpdc, repeat from * till end, slst to first st to join. <72sts>
R 10 & 11: Ch 1, * hdc, hdc, fpdc, fpdc, fpdc, fpdc, hdc, hdc, fpdc, repeat from * till end, slst to first st to join. <72sts>
R 12: Ch 1, * hdc, hdc, sk 2 sts, fptr, fptr, work back into skp sts, fptr, fptr, hdc, hdc, fpdc, repeat from * till end, slst to first st to join. <72sts>
R 13 – 15: Ch 1, * hdc, hdc, fpdc, fpdc, fpdc, fpdc, hdc, hdc, fpdc, repeat from * till end, slst to first st to join. <72sts>
R 16 – 22: Repeat R 12-15
Brim
4.0mm (G/6) Hook
R 1: Ch 1, hdcblo into each of the sts around, slst to first st to join. <72sts>
R 2 – 8: Ch 1, hdc around, slst to first st to join. <72sts>
Tie off, leave a tail approximately 2x the circumference of the hat.
Following the Brim Seaming Instructions to seam up the brim of the hat.
Instructions for Size 10
Remember, the turning chain does NOT count as your first stitch.
4.5mm (G+/7) Hook
R 1: Start with a magic circle. Ch 2, dc 8 into the magic circle. Slst to first st to join. <9 sts>
R 2: Ch 2, work a (dc, fpdc) into each of the sts, slst to first st to join. <18sts>
R 3: Ch 1, * (hdc, fpdc) into dc from previous row, fpdc, repeat from * till end, slst to first st to join. <27sts>
R 4: Ch 1, * hdc, (fpdc, hdc), fpdc, repeat from * till end, slst to first st to join. <36sts>
R 5: Ch 1, * hdc, (fpdc, dc), hdc, fpdc, repeat from * till end, slst to first st to join. <45sts>
R 6: Ch 1, * hdc, (fpdc, dc), fpdc, hdc, fpdc, repeat from * till end, slst to first st to join. <54sts>
R 7: Ch 1, * hdc, (dc, fpdc), fpdc, fpdc, hdc, fpdc, repeat from * till end, slst to first st to join. <63sts>
R 8: Ch 1, * (hdc, hdc), sk 2 sts, fptr, fptr, work back into skp sts, fptr, fptr, hdc, fpdc, repeat from * till end, slst to first st to join. <72sts>
R 9: Ch 1, * hdc, hdc, fpdc, fpdc, fpdc, fpdc, (hdc, hdc), fpdc, repeat from * till end, slst to first st to join. <81sts>
R 10 & 11: Ch 1, * hdc, hdc, fpdc, fpdc, fpdc, fpdc, hdc, hdc, fpdc, repeat from * till end, slst to first st to join. <81sts>
R 12: Ch 1, * hdc, hdc, sk 2 sts, fptr, fptr, work back into skp sts, fptr, fptr, hdc, hdc, fpdc, repeat from * till end, slst to first st to join. <81sts>
R 13 – 15: Ch 1, * hdc, hdc, fpdc, fpdc, fpdc, fpdc, hdc, hdc, fpdc, repeat from * till end, slst to first st to join. <81sts>
R 16 – 22: Repeat R 12-15
Brim
4.0mm (G/6) Hook
R 1: Ch 1, hdcblo into each of the sts around, slst to first st to join. <81sts>
R 2 – 8: Ch 1, hdc around, slst to first st to join. <81sts>
Tie off, leave a tail approximately 2x the circumference of the hat.
Following the Brim Seaming Instructions to seam up the brim of the hat.
Instructions for Size 11
Remember, the turning chain does NOT count as your first stitch.
4.5mm (G+/7) Hook
R 1: Start with a magic circle. Ch 2, dc 8 into the magic circle. Slst to first st to join. <10sts>
R 2: Ch 2, work a (dc, fpdc) into each of the sts, slst to first st to join. <20sts>
R 3: Ch 1, * (hdc, fpdc) into dc from previous row, fpdc, repeat from * till end, slst to first st to join. <30sts>
R 4: Ch 1, * hdc, (fpdc, hdc), fpdc, repeat from * till end, slst to first st to join. <40sts>
R 5: Ch 1, * hdc, (fpdc, dc), hdc, fpdc, repeat from * till end, slst to first st to join. <50sts>
R 6: Ch 1, * hdc, (fpdc, dc), fpdc, hdc, fpdc, repeat from * till end, slst to first st to join. <60sts>
R 7: Ch 1, * hdc, (dc, fpdc), fpdc, fpdc, hdc, fpdc, repeat from * till end, slst to first st to join. <70sts>
R 8: Ch 1, * (hdc, hdc), sk 2 sts, fptr, fptr, work back into skp sts, fptr, fptr, hdc, fpdc, repeat from * till end, slst to first st to join. <80sts>
R 9: Ch 1, * hdc, hdc, fpdc, fpdc, fpdc, fpdc, (hdc, hdc), fpdc, repeat from * till end, slst to first st to join. <90sts>
R 10 & 11: Ch 1, * hdc, hdc, fpdc, fpdc, fpdc, fpdc, hdc, hdc, fpdc, repeat from * till end, slst to first st to join. <90sts>
R 12: Ch 1, * hdc, hdc, sk 2 sts, fptr, fptr, work back into skp sts, fptr, fptr, hdc, hdc, fpdc, repeat from * till end, slst to first st to join. <90sts>
R 13 – 15: Ch 1, * hdc, hdc, fpdc, fpdc, fpdc, fpdc, hdc, hdc, fpdc, repeat from * till end, slst to first st to join. <90sts>
R 16 – 22: Repeat R 12-15
Brim
4.0mm (G/6) Hook
R 1: Ch 1, hdcblo into each of the sts around, slst to first st to join. <90sts>
R 2 – 8: Ch 1, hdc around, slst to first st to join. <90sts>
Tie off, leave a tail approximately 2x the circumference of the hat.
Following the Brim Seaming Instructions to seam up the brim of the hat.
Brim Seaming Instructions
- To create the double brim, fold the half double crochet section in half with the right sides facing inward.
- Align the last row of the brim with the unused front loops from the first row.
- Using a yarn tail approximately twice the circumference of the hat, join the layers by working through the front loop of the last row and the front loop of the first row.
- Use a mattress stitch to seam the brim together, being careful not to pull too tightly. Keeping a bit of flexibility in the seam will ensure a more comfortable fit.
- Once complete, fasten off and weave in any remaining ends.

This is an original pattern by Crafty Bones ©2026. Distribution of this document in whole or in part in any way is not allowed. You may sell finished work with this pattern but please kindly include pattern credit to Leanna Haughian of Crafty Bones or link back to Crafty-Bones.com
Feel free to tag me in any work on social media @Crafty.Bones or use the hashtags #makewithCraftyBones #SintraCabledHat


Where can I get the rest of the sizes for the Sintra hat? The pattern on Ravelry only has Size 1.
Hi Leanna,
I downloaded the Sintra pattern from Ravelry on 3/26/26. I noticed that there is only one size in both your blog & the Ravelry pattern (0-3 months). Marie from Underground Crafters advised me that you would be sending a revision to Ravelry. Unfortunately, I checked my Ravelry account & never received any revision. I would love to make this pattern in an adult size. Any help would be greatly appreciated.
Regards,
Judy