Some links in this post are affiliate links, so I may earn a small commission if you make a purchase. It’s a great way to support Crafty Bones, and it doesn’t cost you anything extra! You can find more details in our Privacy Policy.
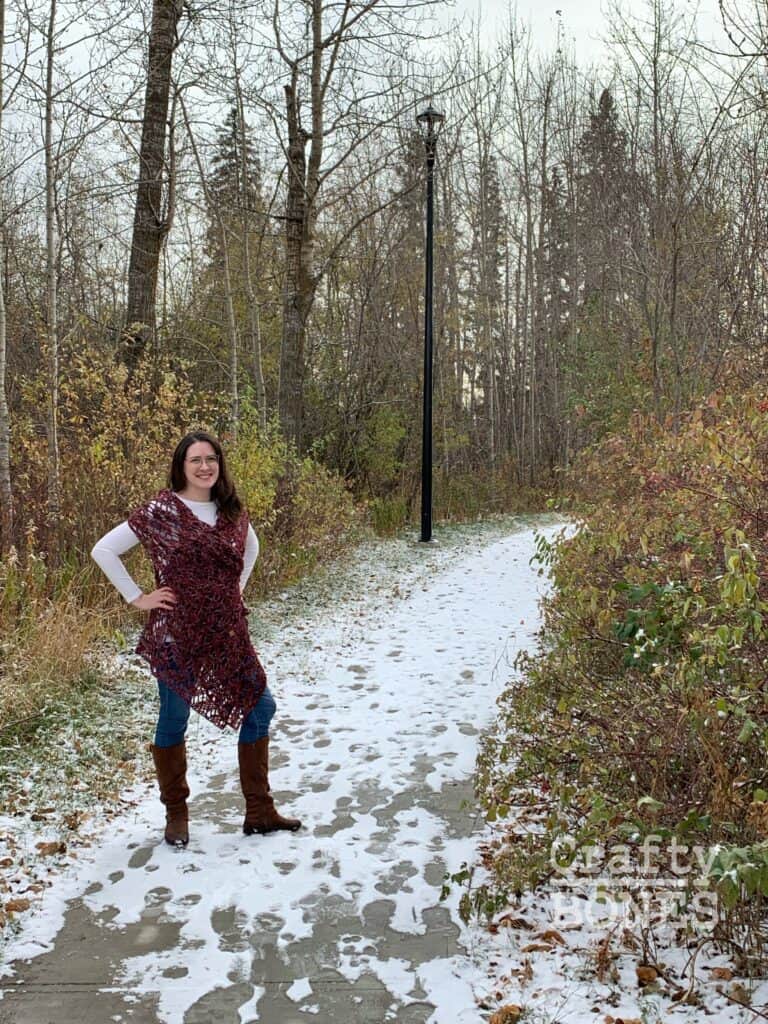
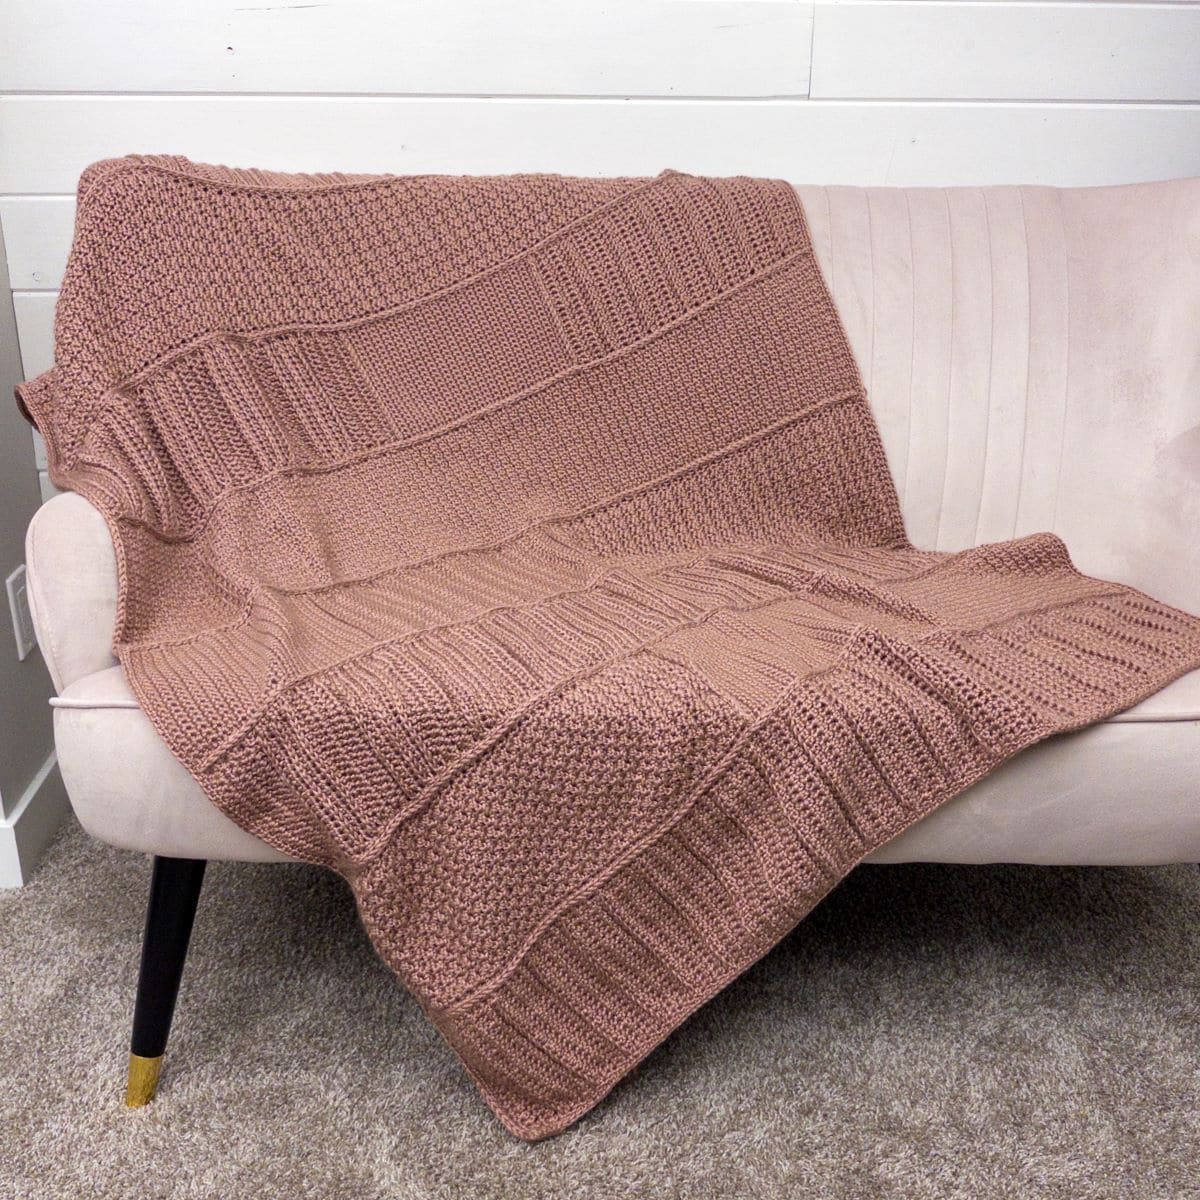
If you’ve ever wanted to explore new crochet stitches without committing to an entire blanket in one style, this project is for you. The Patchwork Crochet Blanket brings together five unique stitch patterns, each worked into its own cozy rectangle. Once you’ve completed them all, you’ll seam the rectangles together to create a stunning, textured blanket that’s full of personality.
A Blanket That Grows With You
This design is more than just a beautiful finished piece, it’s a learning journey. Each section introduces a new stitch pattern, making it a wonderful project for newer crocheters who want to build their skills while creating something truly special.
And because each rectangle is worked separately, you can take your crochet anywhere, whether it’s the kids’ activities, a coffee shop, or a cozy afternoon on the couch. There’s no need to haul around an entire blanket; just grab your current rectangle and go.
Learn by Reading and Seeing
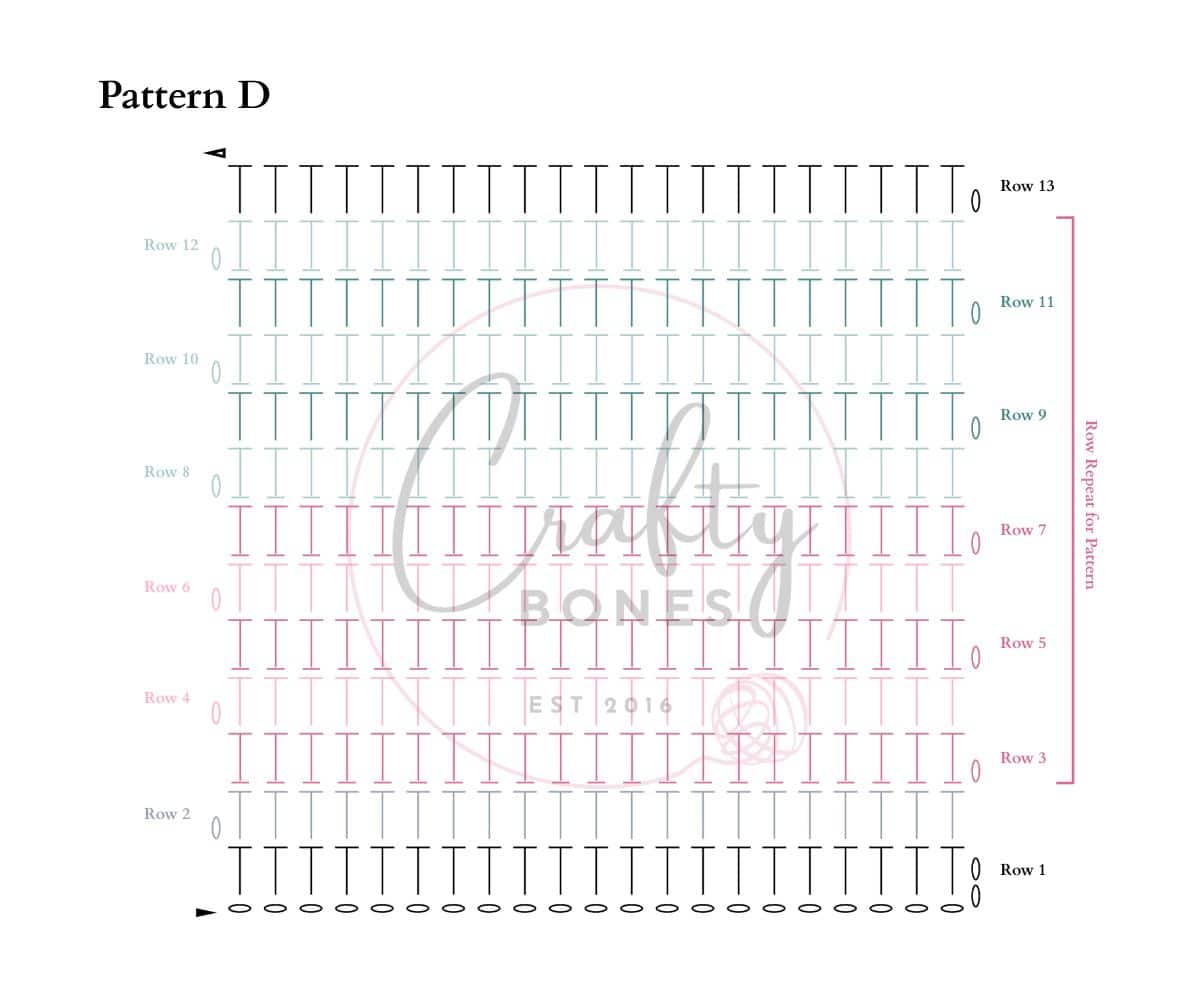
Every stitch pattern in this design comes with both written instructions and a crochet chart, so you can follow along in whichever way helps you learn best. Whether you’re comfortable reading patterns or just starting to explore charts, this project makes it easy to practice both and gain confidence as you go.
You’ll see how the chart visually connects to the written directions, helping you recognize stitch placements and pattern repeats at a glance. It’s a great introduction for anyone wanting to take the next step toward mastering crochet charts.
Why You’ll Love Making It
- Five unique stitch patterns Expand your crochet knowledge while keeping things interesting.
- Written instructions & charts Follow along your way and build your chart-reading confidence.
- Portable & practical Work one rectangle at a time without carrying the full blanket.
- Customizable Choose to create this blanket using one colour, or have fun creating a personalized pallet that’s uniquely yours.
How It’s Made
Choose Your Yarn & Colours
Pick a yarn that highlights texture. The pattern uses Size 4 / Worsted Weight Yarn. Select a cohesive palette or use up your stash for a scrappy feel.
Crochet your Rectangles
This blanket features five unique stitch patterns, each presented with both written and charted instructions to help you follow along with confidence. Each rectangle measures approximately 16.5 cm (6.5″) wide, with lengths that vary to create the finished 114.3 cm x 157.5 cm (45″ x 65″) throw-sized blanket. You can easily add or remove rows to adjust the overall size to your liking.
Block & Seam Together
Once all your rectangles are complete, block them evenly and seam them together using the method outlined in the pattern.
Add a Finishing Border
A unique spin on a single crochet boarder that resembles an icord edge frames the textures and brings the entire blanket together.
Who This Pattern Is For
- Beginners eager to learn new stitches
- Makers wanting to practice reading crochet charts
- Crocheters who prefer modular, on-the-go projects
- Anyone who loves variety, texture, and mindful making
A Blanket Worth the Journey
The Patchwork Crochet Blanket is more than just a blanket. It’s a chance to grow your skills, one stitch pattern at a time. Whether you’re learning how to read charts, exploring new stitches, or simply enjoying the process, the project makes it easy to create something beautiful and meaningful from start to finish.
Ready to give it a try? Grab your favourite worsted-weight yarn and 5.5mm crochet hook, and start building your blanket one rectangle at a time. Each panel adds a new stitch, new texture, and new confidence to your crochet journey.
When you’re finished, I’d love to see your version of the Patchwork Crochet Blanket! Share your project and tag @Crafty.Bones so I can celebrate your beautiful work.
Materials Needed
Crochet Stitches & Abbreviations
US Terms
Third Loop Only |
3lo |
|
Back Loop Only |
blo |
|
Chain |
ch |
|
Double Crochet |
dc |
|
Extended Single Crochet |
esc |
|
Half Double Crochet |
hdc |
|
Single Crochet |
sc |
|
Skip/Skipped |
sk/skd |
|
Stitch/Stitches |
st/sts |
|
Yarn Over |
yo |

Looking to learn new techniques or perfect your skills, our FREE library has everything you need to elevate your crochet projects.
Do I need to know how to read crochet charts to make this Crochet pattern?
I have been focusing on making my patterns more accessible by including both written instructions as well as crochet charts on any new patterns. Prefer written instructions but like to have the visual crochet chart to clarify the stitch placement? Don’t know how to read stitch charts but want to learn by doing patterns that have both written instructions and charts? Prefer working from a crochet chart as you find the symbols easier to follow than a written pattern? This pattern includes the full pattern in written form and the crochet chart.
How Many Rectangles You’ll Need
The chart below shows how many rectangles (or panels) to make for each stitch pattern and size. Each column lists the finished rectangle size, while each row shows how many of that size you’ll need to complete the blanket.
For example, you’ll make four rectangles of Pattern A measuring 25.4 cm (10 inches) and two rectangles of Pattern B measuring 38.1 cm (15 inches). Once you’ve crocheted all your rectangles, you’ll join them together following the layout guide to complete your blanket.
Get the ad-free PDF of the Patchwork Blanket Pattern
Discover the joy of crochet with Crafty Bones.
Not interested in the PDF? The free version of the pattern is just below for you to enjoy.
Gauge
Using single crochet stitch to check if your yarn and hook will match the gauge for this blanket.
14 Stitches x 17 Rows = 4″ (10.16cm) Square
Instructions for Pattern A
You will make 4 panels measuring 10 inch/25.4cm long using Pattern ANote: To create the ridged seam later, work your first row of stitches into the back loop of the starting chain. Remember, the turning chain does NOT count as your first stitch.
Row 1: Ch 22, sc into 2nd ch from hook, sc into each remaining ch across, turn. <21sts>
Row 2: Ch 1, sc into first st, sc into each st across, turn. <21sts>
Row 3 – Row 42: Repeat row 2.
Tie off.
Following the seaming instructions to seam together the blanket.
Instructions for Pattern B
You will make 2 panels measuring 38.1cm/15inches & 1 panel measuring (114.3cm/45inches) long using Pattern BNote: To create the ridged seam later, work your first row of stitches into the back loop of the starting chain. Remember, the turning chain does NOT count as your first stitch.
Row 1: Ch 26, sc into 2nd ch from hook, sc into each remaining ch across, turn. <25sts>
Row 2: Ch 1, sc into first st, *ch 1, sk 1, sc into next st, repeat from * across, turn. <13sts>
Row 3: Ch 1, sc into first st, *ch 1, sk ch st, sc into sc from previous row, repeat from * across, turn. <13sts>
Row 4 to Row 58 (170): Repeat row 3.
Row 59 (171): Ch 1, sc into first st, *sc into ch, sc into sc from previous row, repeat from * across. <25sts>
Tie off
Following the seaming instructions to seam together the blanket.
Instructions for Pattern C
You will make 2 panels measuring 38.1cm/15inches & 1 panel measuring (114.3cm/45inches) long using Pattern CNote: To create the ridged seam later, work your stitches into the back loop of the starting chain. Remember, the turning chain does NOT count as your first stitch.
Row 1: Ch 22, sc into 2nd ch from hook, sc into each remaining ch across, turn. <21sts>
Row 2: Ch 1, esc into first st, esc across, turn. <21sts>
Row 3 – 5: Ch 1, esc into first st, esc across, turn. <21sts>
Row 6 & 7: Ch 1, escblo into the first st, escblo into each st across, turn. <21sts>
Row 8 – 11: Ch 1, esc into first st, esc across, turn. <21sts>
Row 12 & 13: Ch 1, escblo into the first st, escblo into each st across, turn. <21sts>
Row 14 – Row 37 (120): Repeat rows 8 to 13.
Row 38 (121) to Row 40 (123): Ch 1, esc into first st, esc across, turn. <21sts>
Row 41 (124): Ch 1, sc into first st, sc into each st across. <21sts>
Tie off
Following the seaming instructions to seam together the blanket.
Instructions for Pattern D
You will make 2 panels measuring 50.8cm/20inches & 1 panel measuring (114.3cm/45inches) long using Pattern DNote: To create the ridged seam later, work your stitches into the back loop of the starting chain. Remember, the turning chain does NOT count as your first stitch.
Row 1: Ch 23, hdc into 3rd ch from hook, hdc into each remaining ch across, turn. <21sts>
Row 2: Ch 1, hdc into first st, hdc across, turn. <21sts>
Row 3: Ch 1, hdc3lo into first st, hdc3lo across, turn. <21sts>
Row 4: Ch 1, hdc into first st, hdc across, turn. <21sts>
Row 5: Ch 1, hdc3lo into first st, hdc3lo acorss, turn. <21sts>
Row 6: Ch 1, hdc into first st, hdc across, turn. <21sts>
Row 7: Ch 1, hdc3lo into first st, hdc3lo acorss, turn. <21sts>
Row 8 to Row 52(112): Repeat rows 3 to 7.
Row 53(113): Ch 1, hdc into first st, hdc across, turn. <21sts>
Tie off.
Following the seaming instructions to seam together the blanket.
Instructions for Pattern E
You will make 2 panels measuring 50.8cm/20inches & 1 panel measuring (114.3cm/45inches) long using Pattern ENote: To create the ridged seam later, work your stitches into the back loop of the starting chain. Remember, the turning chain does NOT count as your first stitch.
Row 1: Ch 23, sc into 2nd ch from hook, sc into each remaining ch across, turn. <22sts>
Row 2: Ch 1, sc into first st, *work a sc and double crochet into the next st, sk 1, repeat from * across, sc in the last st, turn. <22sts>
Row 3 to Row 51 (124): Ch 1, sc into first st, *work a sc and double crochet into the next st, sk 1, repeat from * acorss, sc in the last st, turn. <22sts>
Row 52 (125): Ch 1, sc into first st, sc into each st across. <22sts>
Tie off.
Following the seaming instructions to seam together the blanket.
This is an original pattern by Crafty Bones ©2025. Distribution of this document in whole or in part in any way is not allowed. You may sell finished work with this pattern but please kindly include pattern credit to Leanna Haughian of Crafty Bones or link back to Crafty-Bones.com
Feel free to tag me in any work on social media @Crafty.Bones or use the hashtags #makewithCraftyBones
How to Seam the Patchwork Blanket Together
To begin assembling your blanket, start by connecting the shorter ends of each rectangle panel. These are the sides where your starting chain and last row are located. Use the layout diagram as your guide to join each panel in the correct order.
1. Join the Short Ends
- Place the panels with the wrong sides facing up.
- Align each short edge according to the layout.
- Work a mattress stitch to seam the panels together, stitching around the post of each stitch rather than into the top loops.
- Continue until all short-end seams are complete and you have all the horizontal rows joined.
2. Prepare to Join the Long Edges
- Next, you’ll seam the 114.3cm/45″ lengths together.
- With the ridge from Step 1 facing the right side of your work, crochet 126 single crochets (sc) evenly across the long edge of each completed row. This ensures the ridge detail remains visible on the right side.
- Once all rows are prepped, place them wrong side up, align the long edges, and join them with a mattress stitch around the stitch posts, just as before.
3. Finishing the Blanket Edges
- Once all panels are joined, work around the entire perimeter of the blanket:
- Round 1: Work 126 single crochets (sc) into the front loop only, or into one of the strands from the side stitches or chains along the edge. Make 5 sc in each corner to help the blanket lay flat.
- Round 2: Flip your work and crochet a second round of sc into the front loop that was not worked into from Round 1 (or the remaining strand fo the chain) all the way around, again working 5 sc in each corner. Be sure to have the same stitch count as Round 1 to keep the edges even.
- When both rounds are complete, use a mattress stitch between the two rounds of single crochet, working around the post of each stitch, just as you did for the panel joins.
This finishing method highlights the ridge detail, strengthens the seams, and gives your patchwork blanket a clean, professional edge with beautiful texture.