Some links in this post are affiliate links, so I may earn a small commission if you make a purchase. It’s a great way to support Crafty Bones, and it doesn’t cost you anything extra! You can find more details in our Privacy Policy.
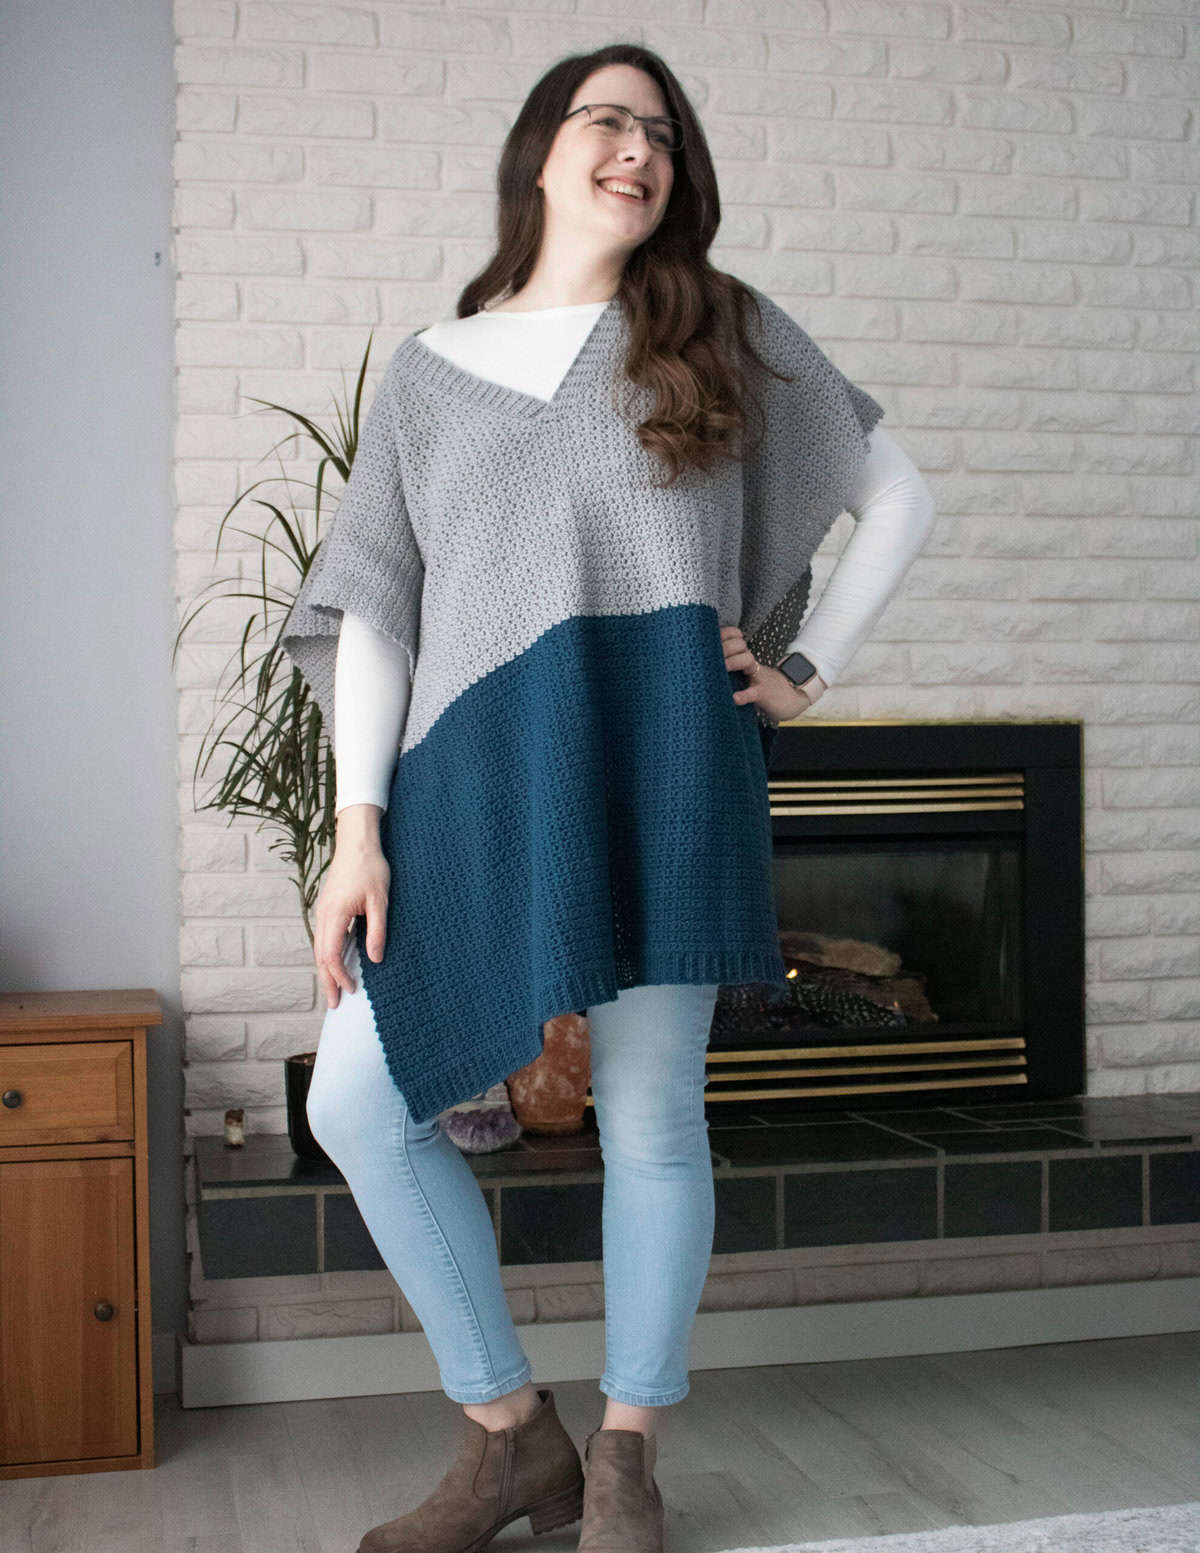
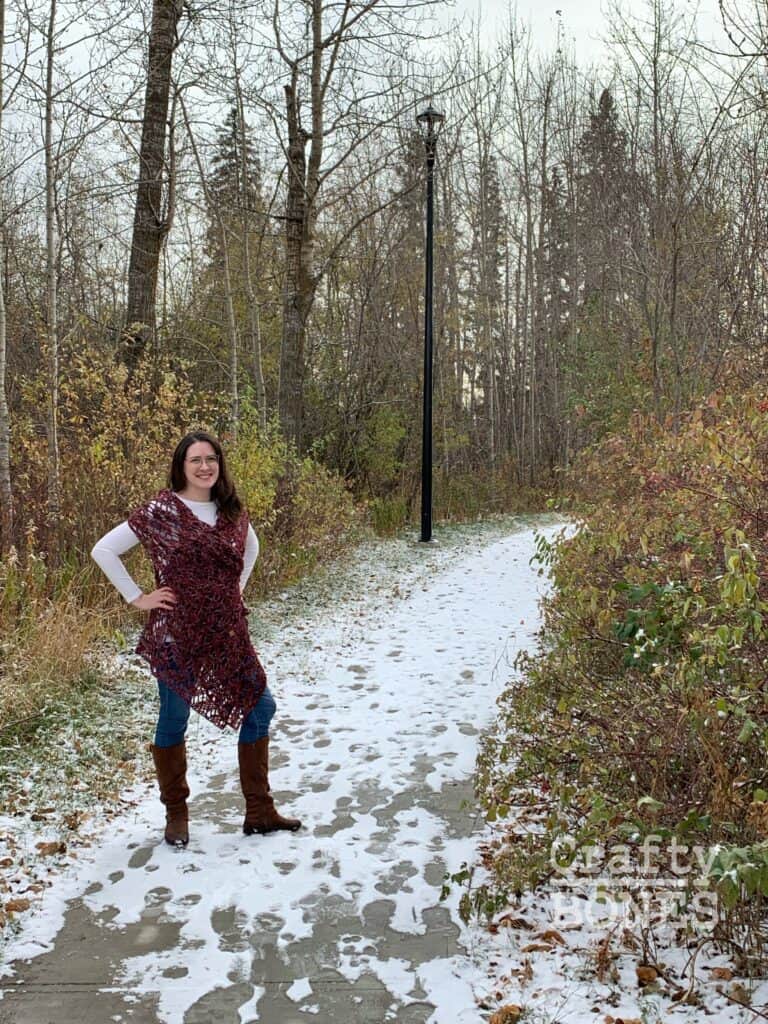
If you’ve been itching to try your hand at making garments, but the thought of shaping, sizing, and seaming has you hesitating—let me introduce you to the Corrie Poncho. This is the easy beginner crochet poncho you didn’t know you needed. It’s oversized, comfy, and perfect for layering all season long. Designed in one solid piece with just seven stitches to seam, it keeps things simple without sacrificing style.
The body is worked in single crochet, but the stitch pattern adds just enough texture and drape to keep it interesting. Whether you’re new to garment-making or just in the mood for a low-fuss, satisfying make—the Corrie Poncho is here to prove that wearable crochet can be both approachable and beautiful.
Why I Love The Corrie Poncho
I’ve always loved a good poncho—it’s like wearing a blanket but somehow still looks put together. The Corrie Poncho was my answer to wanting something cozy, textured, and easy to throw on. It was first featured in Crochet Foundry Magazine’s Spring 2022 issue, and it’s still one of my go-to makes when I want comfort with a little style. No sleeves, barely any seams, and a fun stitch pattern that keeps things interesting.
How to Get the Pattern for the Corrie Poncho
- Free Crochet Pattern: Scroll down for the written free pattern with detailed instructions.
- Printable PDF: Ad-free PDF available to download from Ravelry.
Why You’ll Love the Corrie Poncho Crochet Pattern
The Corrie Poncho is perfect for beginners looking to try their first wearable project without any stress. With minimal seaming (just seven stitches!), it’s a quick and easy make that still delivers beautiful texture and style. Plus, it’s the kind of project you can easily work on while watching your favorite show or relaxing after a busy day. It’s a satisfying, no-pressure project that leaves you with a cozy, wearable piece you’ll reach for again and again.
Ready to make your own? This blog post includes the free pattern for the Corrie Poncho, but if you’d prefer, you can grab the full version in my Ravelry shop. Let’s go over what you’ll need—yarn, sizing, and how much to grab before you start! Don’t forget to share your finished project—I’d love to see how you bring this pattern to life!
Materials Needed

Crochet Stitches & Abbreviations
US Terms
Chain |
ch |
|
CONTinued |
Cont. |
|
Foundation Single Crochet |
Fsc |
|
single Crochet |
sc |
|
single crochet 2 together |
sc2tog |
|
single crochet back loop only |
scblo |
|
Skip/skipped |
sk/skd |
|
Slip stitch |
sl st |
|
stitch/stitches |
st/sts |
|
right side |
rs |
|
Wrong Side |
ws |
Pattern Sizes & Schematics


Pattern Notes
Stitch Markers
Using stitch markers in key places will help keep your stitches aligned and make later steps much easier to follow. For this Beginner friendly ponch, stitch markers are especially helpful in two areas: Marking the First and Last Stitch of each row to keep the edges nice a crisp, when working on the neckline (the pattern will tell you where to put the stitch markers).
construction
The Corrie Poncho is worked flat in one continuous panel, starting at the bottom of the back and working your way up. The neckline is shaped as you go—no extra steps required—then you continue on to complete the front. To make row counting a little easier, I’ve restarted the row numbers at each major section (back, neckline/shoulders, and front). If you want a visual cue, just pop a stitch marker into Row 1 of each new section.
Once the main panel is finished, the ribbing is added directly to the edges—first to the bottom (front and back) and then around the neckline. The ribbing is made using single crochet stitches worked in the back loop only (BLO) for that clean, stretchy texture.
There’s just a teeny bit of seaming—only 7 stitches total at the neckline—which makes this a super approachable project for beginners. Want to turn it into a cozy oversized pullover? Just seam up the sides to the color change and you’ve got yourself a sweater!
Special Stitches
Fsc (foundation single crochet) = ch 2, insert hook in 2nd ch from hook, yo, pull up loop, yo, pull through 1 loop (ch made), yo, pull through 2 loops (sc made), *insert hook in ch of previous st, yo, pull up loop, yo, pull through 1 loop (ch made), yo, pull through 2 loops (sc made); repeat from * until the required number of fsc have been made.

Looking to learn new techniques or perfect your skills, our FREE library has everything you need to elevate your crochet projects.

Gauge
14 Stitches x 16 Rows = 4″ (10cm) Square
To figure out if the yarn and hook you are using will work for this pattern you will want to make a quick gauge swatch.
- Work a fsc of 28, turn.
- Ch 1, sk first st, 2 sc in next st, * sk st, 2 sc in next st, repeat from * ending with 2 sc in last st, turn. (28sts)
- Repeat row 2 a total of 27 times.
- Fasten off and block swatch to check Gauge.
Chart for Gauge Swatch


Do I need to know how to read crochet charts to make this Crochet pattern?
I have been focusing on making my patterns more accessible by including both written instructions as well as crochet charts on any new patterns. Prefer written instructions but like to have the visual crochet chart to clarify the stitch placement? Don’t know how to read stitch charts but want to learn by doing patterns that have both written instructions and charts? Prefer working from a crochet chart as you find the symbols easier to follow than a written pattern? This pattern includes the full pattern in written form and the addition of crochet chart.
Get the ad-free PDF of the Corrie Poncho pattern on Ravelry
Discover the joy of crochet with Crafty Bones.
Not interested in the PDF? The free version of the pattern is just below for you to enjoy.
Video Tutorial
Corrie Poncho Pattern
9 Sizes available so you can get the fit you want!
XS (S, M, L, XL) (2X, 3X, 4X, 5X)
Poncho Back
Colour A
Row 1 (rs): Fsc 134 (140, 144, 150, 152) (156,162, 166, 168), turn. 134 (140, 144, 150, 152) (156, 162, 166, 168) sts
Row 2 (ws): Ch 1, sk first st, 2 sc in next st, * sk st, 2 sc in next st, repeat from * ending with 2 sc in last st, turn. 134 (140, 144, 150, 152) (156, 162, 166, 168) sts
Row 3 to Row 60: Repeat row 2.
Switch to Colour B
Row 61 (rs): Ch 1, sk first st, 2 sc in next st, * sk st, 2 sc in next st, repeat from * ending with 2 sc in last st, turn. 134 (140, 144, 150, 152) (156, 162, 166, 168) sts
Row 62 to Row 124 (126, 127, 128, 129) (130, 130, 132, 132): Ch 1, sk first st, 2 sc in next st, sk st, 2 sc in next st, repeat from * ending with 2 sc in last st, turn. 134 (140, 144, 150,152) (156, 162, 166, 168) sts
Place st markers in st 51 (53, 55, 57, 57) (59, 61, 63, 63) and st 84 (88, 90, 94, 96) (98, 102, 104, 106)
Neckline Side One
Colour B
Row 1: Ch 1, sk first st, 2 sc in next st, * sk st, 2 sc in next st, repeat from * ending with 2 sc in last st right before the st marker, turn. 50 (52, 54, 56, 56) (58, 60, 62, 62) sts
Row 2 to Row 6: Ch 1, sk first st, 2 sc in next st, * sk st, 2 sc in next st, repeat from * ending with 2 sc in last st, turn. 50 (52, 54, 56, 56) (58, 60, 62, 62) sts
Row 7: Ch 1, sk first st, 2 sc in next st, * sk st, 2 sc in next st, repeat from * ending with 3 sc in last st, turn. 51 (53, 55, 57, 57) (59, 61, 63, 63) sts
Row 8: Ch 1, sc in first st, sk st, 2 sc in next st, sk st, 2 sc in next st, repeat from * ending with 2 sc in last st, turn. 51 (53, 55, 57, 57) (59, 61, 63, 63) sts
Row 9: Ch 1, sk first st, 2 sc in next st, * sk st, 2 sc in next st, repeat from * ending with 2 sc in both the second last and last st, turn. 52 (54, 56, 58, 58) (60, 62, 64, 64) sts
Row 10: Ch 1, sk first st, 2 sc in next st, * sk st, 2 sc in next st, repeat from * ending with 2 sc in last st, turn. 52 (54, 56, 58, 58) (60, 62, 64, 64) sts
Row 11 to Row 34 (36, 36, 38, 40) (40, 42, 42, 44): Repeat Rows 7-10. 64 ( 67, 69, 72, 73) (75, 78, 80, 81) sts
You will end after a non-increase row. Do not fasten off as you will return to working on this side. Use a stitch marker to keep your work from frogging.

Neckline Side Two
Colour B
Row 1: Join yarn to st 85 (89, 91, 95, 97) (99, 103, 105, 107) it will be the st on the far side of the second st marker. Ch 1, sk first st, 2 sc in next st, * sk st, 2 sc in next st, repeat from * ending with 2 sc in last st, turn. 50 (52, 54, 56, 56) (58, 60, 62, 62) sts
Row 2 to Row 6: Ch 1, sk first st, 2 sc in next st, * sk st, 2 sc in next st, repeat from * ending with 2 sc in last st, turn. 50 (52, 54, 56, 56) (58, 60, 62, 62) sts
Row 7: Ch 1, sk st, 3 sc in next st, * sk st, 2 sc in next st, repeat from * ending with 2 sc in last st, turn. 51 (53, 55, 57, 57) (59, 61, 63, 63) sts
Row 8: Ch 1, sk first st, 2 sc in next st, * sk st, 2 sc in next st, repeat from * ending with 2 sc in second last st and 1 sc in last st, turn. 51 (53, 55, 57, 57) (59, 61, 63, 63) sts
Row 9: Ch 1, 2 sc in first st, * sk st, 2 sc in next st, repeat from * ending with 2 sc in last st, turn. 52 (54, 56, 58, 58) (60, 62, 64, 64) sts
Row 10: Ch 1, sk first st, 2 sc in next st, * sk st, 2 sc in next st, repeat from * ending with 2 sc in
last st, turn. 52 (54, 56, 58, 58) (60, 62, 64, 64) sts
Row 11 to Row 34 (36, 36, 38, 40) (40, 42, 42, 44): Repeat Rows 7-10. 64 ( 67, 69, 72, 73) (75, 78, 80, 81) sts
You will end after a non-increase row. Fasten off and return to where you left off on Side 1.
Poncho Front
Colour B
Joining Row Size XS ( -, -, L, -) (-, 3XL, 4XL, -)
Row 1: Ch 1, sk first st, 2 sc in next st, * sk st, 2 sc in next st, repeat from * ending with 2 sc in last st of side panel, ch 6, 1 sc into the first st of side 2, sc in next st, rep from * ending with 2 sc in last st, turn. 134 (-, -, 150, -) (-, 162, 166, -) sts
Joining Row Size – (S, M, -, XL) (2XL, -, -, 5XL)
Row 1: Ch 1, sk first st, 2 sc in next st, * sk st, 2 sc in next st, repeat from * across first panel to last 2 sts, sc in second to last st, 2 sc in last st of side panel, ch 6, 2 sc into the first st of side 2, sk 1 st, sc in next st, rep from * ending with 2 sc in last st, turn. – (140, 144, -, 152) (156, -, -, 168) sts
Row 2: Ch 1, sk first st, 2 sc in next st, * sk st, 2 sc in next st, repeat from * ending with 2 sc in last st, turn. {you will treat the chs as sts} 134 (140, 144, 150, 152) (156, 162, 166, 168) sts
Row 3 to Row 34 (34, 35, 34, 33) (34, 32, 34, 32): Ch 1, sk first st, 2 sc in next st, * sk st, 2 sc in next st, repeat from * ending with 2 sc in last st, turn. 134 (140, 144, 150, 152) (156, 162, 166, 168) sts
Switch to Colour A
Next 60 Rows: Ch 1, sk first st, 2 sc in next st, sk st, 2 sc in next st, repeat from * ending
with 2 sc in last st, turn. 134 (140, 144, 150, 152) (156, 162, 166, 168) sts
Fasten off.
Ribbing
Bottom Ribbing
Colour A
Row 1: With RS up, join to the bottom right corner (point A on the diagram) of the poncho. Ch 8, sc in 2nd ch from hook and into each ch. Sl st to next st, and again to the next st along the bottom of the poncho, turn.
Row 2: Sk 2 sl sts, Scblo into each st across, turn. 7 sts
Row 3: Ch 1 (counts as first st in ribbing), scblo in each st, sl st to the next 2 sts along the bottom of the poncho, turn. 7 sts
Repeat row 2 and 3 across the whole bottom of the poncho.
Fasten off.
Repeat the Ribbing on the other side of the Poncho joining at corner B on the diagram with RS up.

Neckline Ribbing
Color B
Row 1: With WS up, join to the inside edge of the row at the bottom of the V on the neckline side 2 (point C on the diagram). Ch 1 (counts as first st), work a sc into each of the 6 chs from row 159 (163, 164, 167, 170) (171, 173, 175, 177), sl st to the edge of Side 1, sl st to the next row up on side 1, turn. 7 sts
Row 2: Sk 2 sl sts, scblo into each st across, turn. 7 sts
Row 3: Ch 1 (counts as first st), scblo into each st across, sl st to the next row along the edge of Side 1, sl st to the next row up on side 1, turn. 7 sts
Repeat row 2 and 3 up around the whole neckline.
The last row will be worked into the same spot (C on the diagram) as the original joined st of the start of the neckline ribbing. Fasten off, leaving a long enough tail to seam the ribbing to row 1 of neckline ribbing.
This is an original pattern by Crafty Bones ©2022. Distribution of this document in whole or in part in any way is not allowed. You may sell finished work with this pattern but please kindly include pattern credit to Leanna Haughian of Crafty Bones or link back to Crafty-Bones.com
Feel free to tag me in any work on social media @Crafty.Bones or use the hashtags #makewithCraftyBones #CorriePoncho
Pin it for later

This looks like a comfy transitional piece for Spring! Lovely design!